Unfortunately 2014 saw my blogging decrease dramatically! But although I wasn't blogging, I was still crafting and in particular I was still decorating cakes.
So here is a recap of the cakes that I made in 2014.
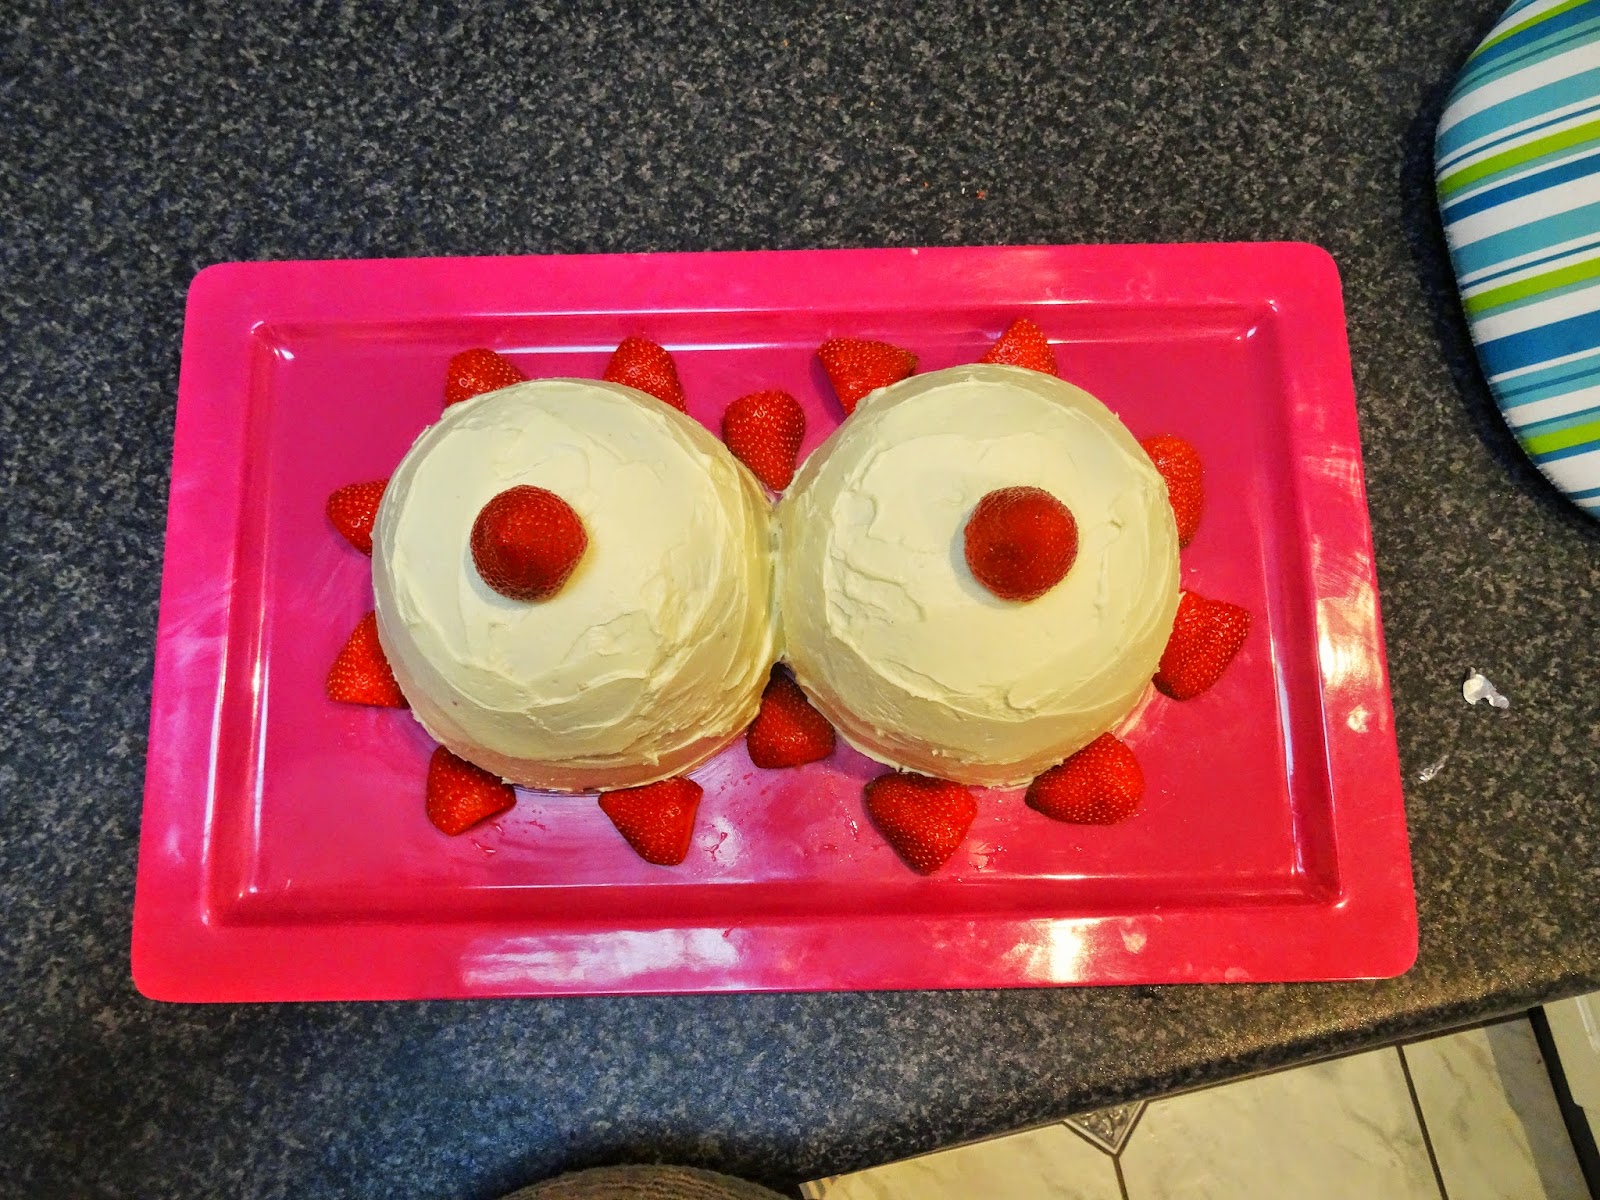
 Baby Shower Elephant Cake
This was a fairly simple cake - apart from the carving of it, and some tricky fondant covering around the trunk and legs. My husband actually made the cakes for these (making one green and one blue), and then did all of the carving as well. Using a bread knife for the bigger cuts, and then a pairing knife for the detail, made it a lot easier. We also used some of the 'scraps' from the back to actually make the trunk.
I used some button fondant moulds for the eye and to attach the tail. Everything else was done completely by hand.
Baby Shower Elephant Cake
This was a fairly simple cake - apart from the carving of it, and some tricky fondant covering around the trunk and legs. My husband actually made the cakes for these (making one green and one blue), and then did all of the carving as well. Using a bread knife for the bigger cuts, and then a pairing knife for the detail, made it a lot easier. We also used some of the 'scraps' from the back to actually make the trunk.
I used some button fondant moulds for the eye and to attach the tail. Everything else was done completely by hand.

The Beatles 60th Birthday Cake
This cake was commissioned by a colleague of a friend of mine (complete stranger). They had ordered a cake, and found out a week before the party that the cake wouldn't be coming! So I stepped in and made this cake. It is covered completely with fondant.
I printed out The Beatles logo and the text to go around the cake, and used that as a template. They wanted black ribbon around the bottom of the cake, but I decided that a black fondant ribbon was better because you'd be able to eat that!
 Rodeo Princess Cake
This cake was requested by a woman that I worked with for her daughter's 21st birthday party. I was told that Alex-Kate was a girly girl who was also a little bit country, so a Rodeo Princess cake seemed perfect.
The entire cake is covered in fondant, and everything is made out of fondant. I used a letter cutter for the letters and numbers (always be sure to make extras just in case you break some!), and I used an 'extruder' to push out the perfectly even lengths of fondant for the crown, but unfortunately I didn't use any CMC or Tylose in the fondant for the crown and so it ended up falling apart, so frustrating! I followed this tutorial here to make the crown.
Rodeo Princess Cake
This cake was requested by a woman that I worked with for her daughter's 21st birthday party. I was told that Alex-Kate was a girly girl who was also a little bit country, so a Rodeo Princess cake seemed perfect.
The entire cake is covered in fondant, and everything is made out of fondant. I used a letter cutter for the letters and numbers (always be sure to make extras just in case you break some!), and I used an 'extruder' to push out the perfectly even lengths of fondant for the crown, but unfortunately I didn't use any CMC or Tylose in the fondant for the crown and so it ended up falling apart, so frustrating! I followed this tutorial here to make the crown.
 Hydrangea Birthday Cake
I have been wanting to make a cake like this for a while, and so my Mother-in-Law's birthday presented the perfect opportunity. Using a hydrangea mould and cutter, I pre-made all of the flowers a week or two before hand (while watching Sex and the City probably). I used a couple of different shades of blue, and also dusted the petals with some blue and green petal dust.
Once the petals were done, making the cake itself wasn't too hard. My husband helped with the carving once again, and we got the pot sorted and then just piled the left over bits of cake on the top. I covered the top with some regular icing and then got to sticking all of the flowers onto it. I was really happy with the result, and I would definitely make a cake like this again.
Hydrangea Birthday Cake
I have been wanting to make a cake like this for a while, and so my Mother-in-Law's birthday presented the perfect opportunity. Using a hydrangea mould and cutter, I pre-made all of the flowers a week or two before hand (while watching Sex and the City probably). I used a couple of different shades of blue, and also dusted the petals with some blue and green petal dust.
Once the petals were done, making the cake itself wasn't too hard. My husband helped with the carving once again, and we got the pot sorted and then just piled the left over bits of cake on the top. I covered the top with some regular icing and then got to sticking all of the flowers onto it. I was really happy with the result, and I would definitely make a cake like this again.
 The Little Mermaid Cake
A while ago I bought a red-headed Dolly Varden doll, just in case I ever got to use it. Thankfully my sister-in-law's birthday offered me the perfect opportunity (she loves The Little Mermaid!). I had some trouble making the Dolly Varden cake, unfortunately, and that was really frustrating, but once I had one I could use, the rest was really easy.
For Ariel's tail I just used a big piece of green fondant and shaped it into a tail. I then used a little cake decorators tool to press in all of the scale like indents. My husband had a lot of fun helping me with making some shells and other sea creatures to decorate the rock, and I used a branch mould to make some seaweed.
The Little Mermaid Cake
A while ago I bought a red-headed Dolly Varden doll, just in case I ever got to use it. Thankfully my sister-in-law's birthday offered me the perfect opportunity (she loves The Little Mermaid!). I had some trouble making the Dolly Varden cake, unfortunately, and that was really frustrating, but once I had one I could use, the rest was really easy.
For Ariel's tail I just used a big piece of green fondant and shaped it into a tail. I then used a little cake decorators tool to press in all of the scale like indents. My husband had a lot of fun helping me with making some shells and other sea creatures to decorate the rock, and I used a branch mould to make some seaweed.
 Marilyn Monroe Birthday Cake
For my Mum's birthday I decided that a Marilyn Monroe cake would be perfect - she's been bugging me to make her a cake for ages, so I finally caved and made this.
This is probably one of the hardest cakes that I've ever made. After covering the cake in white fondant I used a silhouette template to trace the design directly onto the fondant. Then I used a black royal icing tube to carefully go over the tracing. It took quite a while, resulted in some very sore hands, and I wasn't completely happy with how it turned out. But it was very tricky, so I was happy enough. The bow was probably the easiest bit!
Marilyn Monroe Birthday Cake
For my Mum's birthday I decided that a Marilyn Monroe cake would be perfect - she's been bugging me to make her a cake for ages, so I finally caved and made this.
This is probably one of the hardest cakes that I've ever made. After covering the cake in white fondant I used a silhouette template to trace the design directly onto the fondant. Then I used a black royal icing tube to carefully go over the tracing. It took quite a while, resulted in some very sore hands, and I wasn't completely happy with how it turned out. But it was very tricky, so I was happy enough. The bow was probably the easiest bit!
 Paris Birthday Cake
This cake was made for a very special 9 year old's birthday - she had recently become obsessed with all things French, and therefore a French themed cake was required. The Mum had purchased the Eiffel Tower, so that made life a lot easier in making the cake. I did have a few issues, however, because I was using a brand of fondant that I'm not used to (Satin Ice, whereas I usually use Pettinice) and I found that it was quite sticky and didn't hold it's form as well as I would have liked. But the cake worked out quite well and was enjoyed by all (and naturally it was pink and white inside!).
Pole Dancing Birthday Cake
Paris Birthday Cake
This cake was made for a very special 9 year old's birthday - she had recently become obsessed with all things French, and therefore a French themed cake was required. The Mum had purchased the Eiffel Tower, so that made life a lot easier in making the cake. I did have a few issues, however, because I was using a brand of fondant that I'm not used to (Satin Ice, whereas I usually use Pettinice) and I found that it was quite sticky and didn't hold it's form as well as I would have liked. But the cake worked out quite well and was enjoyed by all (and naturally it was pink and white inside!).
Pole Dancing Birthday Cake
 One of my colleagues at work is a Pole Dancing star, and so her birthday was the perfect opportunity to make a pole dancing cake. The cake is covered with fondant to resemble a stage, and I wrapped a skewer in white fondant which I then painted silver with edible paint.
To make the pole dancing figures I printed out photos of Glentin from Instagram and made them into stencils (some black texta to colour them in, then covered with sticky tape and cut out). Instead of using fondant again, I used pre-coloured modelling chocolate. This was the first time I had used modelling chocolate and it was really easy to work with (once you warm it up enough so that it is pliable). I rolled it out into a sheet, and then cut out the silhouettes using a knife. I put the cut silhouettes in the fridge to go hard, and then on the day of presenting the cake I stuck them to the pole using some flower glue. It worked perfectly!
One of my colleagues at work is a Pole Dancing star, and so her birthday was the perfect opportunity to make a pole dancing cake. The cake is covered with fondant to resemble a stage, and I wrapped a skewer in white fondant which I then painted silver with edible paint.
To make the pole dancing figures I printed out photos of Glentin from Instagram and made them into stencils (some black texta to colour them in, then covered with sticky tape and cut out). Instead of using fondant again, I used pre-coloured modelling chocolate. This was the first time I had used modelling chocolate and it was really easy to work with (once you warm it up enough so that it is pliable). I rolled it out into a sheet, and then cut out the silhouettes using a knife. I put the cut silhouettes in the fridge to go hard, and then on the day of presenting the cake I stuck them to the pole using some flower glue. It worked perfectly!
 Sex Panther Cake - 60% of the time, it works EVERY time!
Another of my work friends is an Anchorman fan (always quoting the movie), so I decided to make her a Sex Panther cake. Completely random, I know, but fun nonetheless.
It's a basic square cake, I coloured some white icing green and piped it on to represent the grass that the Sex Panther cologne sits in, and used brown icing around the sides to represent the box. The Panther head was a bit trickier - but with a big ball of black fondant, a great online guide (find it here), and some persistence, I made it happen. Unfortunately my friend was totally confused when she first saw the cake - but then she got it and loved it. Her partner tried to eat the Panther head, but the fact that it is made from pure fondant defeated him.
Sex Panther Cake - 60% of the time, it works EVERY time!
Another of my work friends is an Anchorman fan (always quoting the movie), so I decided to make her a Sex Panther cake. Completely random, I know, but fun nonetheless.
It's a basic square cake, I coloured some white icing green and piped it on to represent the grass that the Sex Panther cologne sits in, and used brown icing around the sides to represent the box. The Panther head was a bit trickier - but with a big ball of black fondant, a great online guide (find it here), and some persistence, I made it happen. Unfortunately my friend was totally confused when she first saw the cake - but then she got it and loved it. Her partner tried to eat the Panther head, but the fact that it is made from pure fondant defeated him.
 St George Illawarra Football Team Cake
Another work friend and another cake - this time for a farewell. For this cake I got a print out of the football teams logo and used flood icing to recreate it. Basically I got a piece of Freezer Go-Between (clear plastic stuff) and laid it over the print out. Then I got black royal icing (fairly stiff) and piped the outline of the logo. Once that was set a bit I went back with some softer royal icing and 'flooded' the parts. After leaving that to set I went back to re-enforce some of the black lines.
I then placed the set logo on top of a red fondant panel using some flower glue, and used red icing to paint on the words (I was too lazy to use fondant). When doing something like this it is always good to make a couple, just in case something breaks. Actually I think the horses leg had snapped off, but it was easy enough to re-attach to the background. The cake inside was one layer red, one layer white.
St George Illawarra Football Team Cake
Another work friend and another cake - this time for a farewell. For this cake I got a print out of the football teams logo and used flood icing to recreate it. Basically I got a piece of Freezer Go-Between (clear plastic stuff) and laid it over the print out. Then I got black royal icing (fairly stiff) and piped the outline of the logo. Once that was set a bit I went back with some softer royal icing and 'flooded' the parts. After leaving that to set I went back to re-enforce some of the black lines.
I then placed the set logo on top of a red fondant panel using some flower glue, and used red icing to paint on the words (I was too lazy to use fondant). When doing something like this it is always good to make a couple, just in case something breaks. Actually I think the horses leg had snapped off, but it was easy enough to re-attach to the background. The cake inside was one layer red, one layer white.
 Tardis Birthday Cake
This cake was requested by a friend for his 30th birthday, and so I did my best. I learnt a lot from doing this cake, especially that the internal structure of the cake is probably the most important thing! Because the cake was not completely square and level it made it more difficult to cover with fondant, and then it also meant that it ended up collapsing a bit (even though I had used skewers to reinforce it).
If I was going to make this cake again, I would: use denser cake so it is more brick like, use bigger dowels through the cake to try and sure it up, pre-make the windows to put on as I think it would have looked a bit neater.
Although it wasn't perfect, the overall effect was there, it wasn't a bad first try.
Tardis Birthday Cake
This cake was requested by a friend for his 30th birthday, and so I did my best. I learnt a lot from doing this cake, especially that the internal structure of the cake is probably the most important thing! Because the cake was not completely square and level it made it more difficult to cover with fondant, and then it also meant that it ended up collapsing a bit (even though I had used skewers to reinforce it).
If I was going to make this cake again, I would: use denser cake so it is more brick like, use bigger dowels through the cake to try and sure it up, pre-make the windows to put on as I think it would have looked a bit neater.
Although it wasn't perfect, the overall effect was there, it wasn't a bad first try.
And that, my friends, is a year in cakes!! I'm not sure what 2015 will bring as I am due to have a baby in May - so it may be only store bought cakes from here on in!


.JPG)
.JPG)